
本文5600字大约需要花费15分钟阅读,文章图片过多,建议 wifi环境阅读。
[TOC]
制作导航条
在上一篇文章所说,我们已经做出了侧边栏的效果了。

上图是右侧的导航条,虽然内容很少,但是确实一直悬浮在最上层的。
我们新建一个类 NavigationBar类继承于我们的 BaseView,我们再创建一个 NavigationBar.xib。
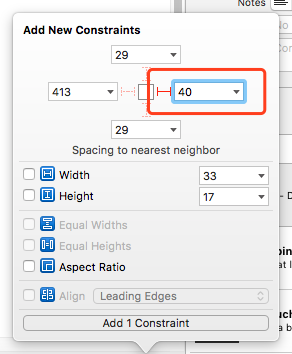
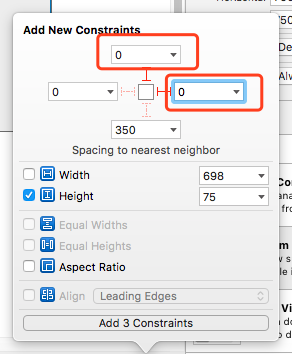
因为 NavigationBar高度为 75是固定的,所以布局要让宽度进行自适应。
我们拖拽一个 NSView继承与 SideMenuItemView,右侧显示当前的版本号。我们先拖拽一个 Label入局如下:
我们设置文本颜色为 9ea1a3,字体20,版本我们就设置为 v0.5.1
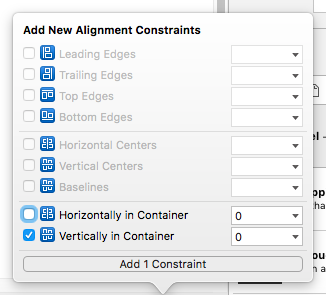
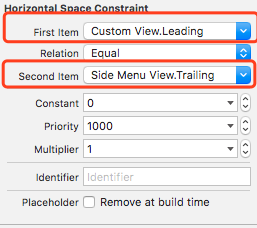
我们将刚才的 SideMenuItemView的布局设置如下。
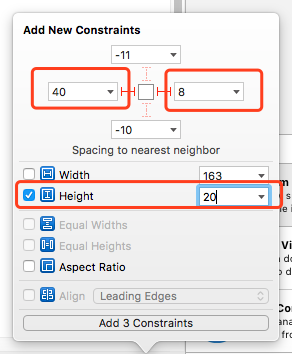
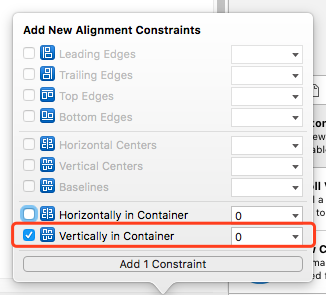
我们拖拽一个 NSView试图继承与 NavigationBar放置在 ViewController的试图上面,布局设置如下。
我们设置背景颜色为白色。
我们在 NavigationBar关联试图上面的 SideMenuItemView控件。
@IBOutlet weak var blogMenuItem: SideMenuItemView!
我们设置一下 blogMenuItem的基本参数。
required init?(coder: NSCoder) {
    super.init(coder: coder)
    self.loadXibView()
    self.blogMenuItem.iconImageView.iconHex = "F015"
    self.blogMenuItem.itemTitle.stringValue = "我的博客"
}
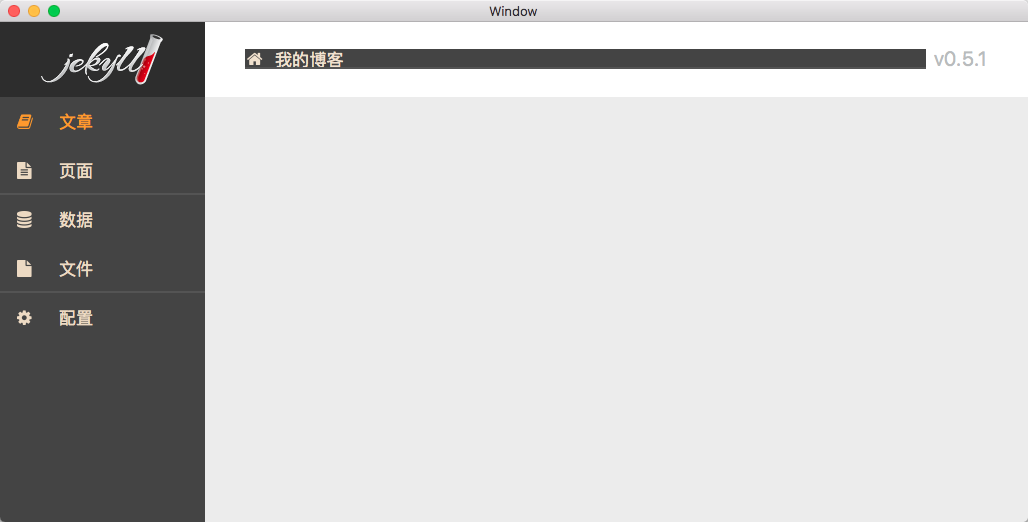
我们运行起来可以看到这样的效果图了。
⚠️因为之前我们的
SideMenuItemView设置了背景颜色,所以我们在SideMenuItemView.xib设置默认透明即可。

下面还有一条线,默认情况是不允许出现的,我们设置 SideMenuItemView默认不显示下面的线。

字体颜色我们设置默认为 444444。我们设置 SideMenuItemView图标颜色为 444444。
self.blogMenuItem.iconImageView.color = NSColor(red:0.267, green:0.267, blue:0.267, alpha:1.000)

现在我们的界面已经做出来了。
但是我们的博客名字一般都是自己配置的,我们想获取我们自己配置的博客名称怎么办呢?
我们利用获取配置的请求。
http://localhost:4000/_api/configuration
我们既然有接口了,自然需要网络请求框架了,难道我们是请求系统的 API?
NO!NO!NO!
使用网络框架Alamofire
我们使用 Swift最大的请求框架 Alamofire。
Alamofire(Objective-C 中的 AFNetWorking)
我们在我们的 podfile文件里面添加如下的代码。
pod 'Alamofire', '~> 4.4'
运行安装命令
pod install
既然有数据接口,我们自然需要有统一接口管理。我们新建一个 Api文件夹。
我们新建一个类 GetConfigurationApi用于获取系统的配置。
我们导入 Alamofire库。
import Alamofire
我们写一个 loadRequest方法用于发起请求。
func loadRequest() {
    Alamofire.request("http://localhost:4000/_api/configuration", method: .get).responseJSON { (response) in
    }
}
⚠️我也是刚刚才看的
Alamofire API的文档。
使用 SwiftyJSON
对于 Model模型库我们使用 SwiftyJSON。
pod 'SwiftyJSON', '~>3.1.4'l
参考资料: [SwiftyJSON介绍](http://tangplin.github.io/swiftyjson/)

我们在官方的文档里面发现了 怎么在 Alamofire使用 SwiftyJSON的代码,我们添加到我们代码里面。
func loadRequest() {
    Alamofire.request("http://localhost:4000/_api/configuration", method: .get).responseJSON { (response) in
        switch response.result {
            case .success(let value):
            let json = JSON(value)
            print(json)
            case .failure(let error):
            print(error)
        }
    }
}
我们在 ViewController测试一下我们的请求。
override func viewDidLoad() {
    super.viewDidLoad()
    let getConfigurationApi = GetConfigurationApi()
    getConfigurationApi.loadRequest()
}
但是我们在输出看到下面一段信息。
2017-06-10 11:40:28.476420+0800 Jekyll-Admin-Mac[42248:987400] App Transport Security has blocked a cleartext HTTP (http://) resource load since it is insecure. Temporary exceptions can be configured via your app's Info.plist file.
Error Domain=NSURLErrorDomain Code=-1022 "The resource could not be loaded because the App Transport Security policy requires the use of a secure connection." UserInfo={NSUnderlyingError=0x60000004e1f0 {Error Domain=kCFErrorDomainCFNetwork Code=-1022 "(null)"}, NSErrorFailingURLStringKey=http://localhost:4000/_api/configuration, NSErrorFailingURLKey=http://localhost:4000/_api/configuration, NSLocalizedDescription=The resource could not be loaded because the App Transport Security policy requires the use of a secure connection.}
✅因为从
iOS10开始苹果在默认新建工程里面默认关闭了HTTP`的支持,我们开启一下。参考资料: 关于 iOS 10 中 ATS 的问题。
iOS10开启启用 HTTP 请求
我们打开工程的 info.plist。


此时我们再次的运行发现已经打印出来数据了。
到目前为止,我们并没有发现 SwiftyJSON可以转 Model模型的功能。这个时候我们考虑换成可以转换模型的库 ObjectMapper。
使用 ObjectMapper
参考资料: SwiftyJson + ObjectMapper + Argo。
我们在 GetConfigurationApi.swift文件里面声明 JekyllConfiguration类。
class JekyllConfiguration: Mappable {
    var title:String?
    required init?(map: Map) {

    }
    func mapping(map: Map) {
        title <- map["title"]
    }
}
我们暂时先获取配置里面的 title用于我们显示博客的名字。
func loadRequest() {
    Alamofire.request("http://localhost:4000/_api/configuration", method: .get).responseJSON { (response) in
        switch response.result {
            case .success(let value):
                guard let valueDic = value as? [String:Any] else {
                    return
                }
                guard let content = valueDic["content"] as? [String:Any] else {
                    return
                }
                guard let configuration = JekyllConfiguration(JSON: content) else {
                    return
                }
                guard let titlt = configuration.title else {
                    return
                }
                print(titlt)
            case .failure(let error):
                print(error)
        }
    }
}
因为我们的数据是在 Content层次的所以需要剥丝抽茧才可以拿到数据。

由此可以我们已经可以拿到数据了。
我们已经拿到了数据,但是我们究竟如何才能让外接知道数据呢。那就用到了回调,在 Swift我们叫做闭包。
typealias GetConfigurationApiSuccessCompletionHandle = (_ configuration:JekyllConfiguration) -> Void
typealias GetConfigurationApiFailureCompletionHandle = (_ error:Error?) -> Void
给 loadRequest增加两个回调的属性。
func loadRequest(success:GetConfigurationApiSuccessCompletionHandle?, failure:GetConfigurationApiFailureCompletionHandle?) {
    Alamofire.request("http://localhost:4000/_api/configuration", method: .get).responseJSON { (response) in
        switch response.result {
            case .success(let value):
                guard let valueDic = value as? [String:Any] else {
                    self.completionHandle(success: nil, failure: failure, configuration: nil, error: nil);
                    return
                }
                guard let content = valueDic["content"] as? [String:Any] else {
                    self.completionHandle(success: nil, failure: failure, configuration: nil, error: nil);
                    return
                }
                guard let configuration = JekyllConfiguration(JSON: content) else {
                    self.completionHandle(success: nil, failure: failure, configuration: nil, error: nil);
                    return
                }
                self.completionHandle(success: success, failure: nil, configuration: configuration, error: nil)
            case .failure(let error):
                self.completionHandle(success: nil, failure: failure, configuration: nil, error: error)
        }
    }
}

func completionHandle(success:GetConfigurationApiSuccessCompletionHandle?, failure:GetConfigurationApiFailureCompletionHandle?, configuration:JekyllConfiguration?, error:Error?) {
    if let success = success , let configuration = configuration{
        success(configuration)
    } else if let failure = failure {
        failure(error)
    }
}
有了数据了,我们把 NavigationBar绑定到 ViewController的类里面。
@IBOutlet weak var navigationBar: NavigationBar!
我们在回调的时候设置一下标题。
override func viewDidLoad() {
    super.viewDidLoad()
    let getConfigurationApi = GetConfigurationApi()
    getConfigurationApi.loadRequest(success: { (configuration) in
        guard let title = configuration.title else {
            return
        }
        self.navigationBar.blogMenuItem.itemTitle.stringValue = title
    }) { (error) in

    }
}
⚠️写到这里我们可能回想,我们在
Objective-C里面的Block里面我们需要解决循环引用。这里的闭包是否也需要解决循环引用,但是这个方法是属于方法闭包,理论上不存在循环引用的,我也不是很清楚。
关于 Swift闭包里面循环引用
我们修改请求的代码如下:
override func viewDidLoad() {
    super.viewDidLoad()
    let getConfigurationApi = GetConfigurationApi()
    getConfigurationApi.loadRequest(success: { [weak self] (configuration) in
        guard let title = configuration.title else {
            return
        }
        self?.navigationBar.blogMenuItem.itemTitle.stringValue = title
    }) { (error) in

    }
}
导航条做完之后,我们剩下要做的就是内容区域了。因为 文章 页面 数据界面可以使用同一个模板,我们就封装成一个模板。

封装模块
这一块区域大部分都是相同的,我们也封装成父类,实现用子类。
我们新建一个类名字叫做 ContentHeader,高度我们设置为 44。
我们拖拽一个 Label布局设置如下。


我们设置字体颜色为 444444,字体大小为 30。
我们发现有的视频大致分为两类。

- 文章
- 页面
- 数据
- 文件

- 配置
我们放置一个NSView试图用于托管这两种的子试图,布局如下。


我们新建一个类 ContentHeaderValue1展示下面界面。
我们设置 ContentHeaderValue1.xib的 View的高度为 40。
我们在 ContentHeaderValue1.xib拖拽一个 NSView继承与 SideMenuItemView。
布局如下。


我们在右侧拖拽一个 NSTextFiled,布局如下。


我们设置 SideMenuItemView的背景颜色为 ff6e00。
设置 NSView的圆角
我们可以发现界面很多都用到了圆角,这对于 iOS里面是很常见的。我们新建一个 NSView的分类NSView+CornerRadius用于画圆角。
@IBDesignable extension NSView {
    @IBInspectable var cornerRadius:Float? {
        get {
            guard let cornerRadius = self.layer?.cornerRadius else {
                return nil
            }
            return Float(cornerRadius)
        } set {
            guard let newValue = newValue else {
                return
            }
            self.layer?.masksToBounds = true
            self.layer?.cornerRadius = CGFloat(newValue)
        }
    }
}
解决 Xib无法显示自定义控件从 Xib加载的问题。
之前自定义控件是加载 Xib的,运行的时候是可以出现的。但是在 Xib是无法进行预览的,我以为这应该属于正常的情况,毕竟程序还没有进行运行。
前两天看到一位大神写的 iOS-Storyboad动态刷新。我才发现原来在 Xib里面是可以进行实时看到的。
原来我们当时进行加载 Xib的路径不正确,加载的路径属于运行时候路径和 Xib显示加载的路径不是一样的。
我们修改加载 Xib获取 Bundle的方法如下:
Bundle(for: type(of: self)).loadNibNamed(nibName, owner: self, topLevelObjects: &views)
Objective-C 中的 [self class] 用 Swift怎么表示
我们之前用 Objective-C进行经常这样写 self.class或者 [self class]但是我们想在 Swift怎么获取 anyClass的对象呢。
比如 UIViewController我们直接可以 这样获取 UIViewController.type。但是 self这个关键字我们根本不知道是哪一个类,我们最后查询可以利用下面代码获取。
let anyClass = type(of:self)

此时我们在 Xib里面已经可以在里面预览到 SideMenuItemView的样子了。
关于 prepareForInterfaceBuilder()方法
这个方法可以只在预览 Xib的时候起作用可以做一些 Moke数据。
参考资料: IBInspectable和IBDesignable。
我们在 SideMenuItemView写一下这个方法。
override func prepareForInterfaceBuilder() {
    super.prepareForInterfaceBuilder()
    self.itemTitle.stringValue = "测试"
    self.iconImageView.iconHex = "F15C"
}
我们在 SideMenuView.xib已经可以看到我们写的测试数据了。

解决 NSView不能显示圆角的问题。
我们刚才 NSView+CornerRadius.swift文件给 NSView做了一个分类用于设置圆角,我们发现并不成功。
我们需要设置 wantsLayer属性。
self.wantsLayer = true
参考资料 : Mac开发。 从 UIKit 到 AppKit。
设置此属性的值以
true将视图转换为层次支持的视图,即视图使用CALayer对象来管理其渲染的内容。创建层支持的视图隐式地导致该视图下的整个视图层次结构成为层支持。因此,视图及其所有子视图(包括子视图的子视图)都将被层叠支持。此属性的默认值为false。在层次支持的视图中,视图完成的任何绘图都将缓存到底层图层对象。然后,可以以比显式显示视图内容更有效的方式来操纵缓存的内容。AppKit会自动创建底层图层对象(使用该方法)并处理视图内容的缓存。如果该方法返回,则不应直接与底层对象进行交互。相反,使用此类的方法对视图及其图层进行任何更改。如果返回,则在视图方法中修改图层是合适的(并且适当)。
makeBackingLayer()wantsUpdateLayerfalsewantsUpdateLayertrueupdateLayer()对于层次支持的视图,您可以通过将属性设置为平坦化层次结构。为了防止子视图将其内容放大到此视图的图层中,请将子视图的属性值显式设置为。
canDrawSubviewsIntoLayertruewantsLayertrue除了创建层支持的视图,您还可以通过将图层直接分配给视图的
layer属性来创建层托管视图。在层托管视图中,您负责管理视图的图层。要创建层托管视图,您必须首先设置layer属性,然后将此属性设置为true。设置这些属性的值的顺序至关重要。在图层托管视图中,不要依赖视图进行绘图。同样,不要在分层托管视图中添加子视图。根层(即使用
layer属性设置的层)成为层树的根层。必须使用Core Animation界面对该图层树进行任何操作。您仍然使用该视图来处理鼠标和键盘事件,但绘图必须由Core Animation处理。
使用 CALayer设置背景颜色
我们修改 BaseView的方法如下:
@IBInspectable var backgroundColor:NSColor! = NSColor.clear {
    didSet {
        self.wantsLayer = true
        self.layer?.backgroundColor = self.backgroundColor.cgColor
    }
}
这样我们为何不通过分类设置基于 NSView的背景颜色。
import AppKit

extension NSView {
    @IBInspectable var backgroundColor:NSColor! {
        get {
            guard let backgroundColor = NSColor(cgColor: (self.layer?.backgroundColor)!) else {
                return NSColor.clear
            }
            return backgroundColor
        }
        set {
            self.wantsLayer = true
            self.layer?.backgroundColor = newValue.cgColor
        }
    }
}
设置 ContentHeader右侧试图
因为我们只有两种显示情况,我们用 enum创建一个枚举用于区分类型。
enum ContentHeaderStyle {
    case value1
    case value2
}
我们创建一个可以 Xib设置样式的属性。
@IBInspectable var style:ContentHeaderStyle = ContentHeaderStyle.value1 {
    didSet {
    }
}
我们每次设置需要重新移除右侧试图,所以我们需要关联一下右侧的父试图。
@IBOutlet weak var rightContentView: NSView!
我们写一个方法用于加载 ContentHeaderValue1。
我们重写 ContentHeaderValue1的 override init(frame frameRect: NSRect)方法可以让外部通过 frame初始化。
override init(frame frameRect: NSRect) {
    super.init(frame: frameRect)
    self.loadXibView()
}
func loadStyle1() {
    let style1View = ContentHeaderValue1(frame: self.rightContentView.bounds)
    style1View.autoresizingMask = [.viewWidthSizable,.viewHeightSizable]
    self.rightContentView.addSubview(style1View)
}
我们在 ContentHeader的属性 style用于加载我们刚才写的方法
@IBInspectable var style:ContentHeaderStyle = ContentHeaderStyle.value1 {
    didSet {
        switch style {
        case .value1:
            self.loadStyle1()
        case .value2:
            break
        }
    }
}
我们在 ViewController拖拽一个 NSView继承与 ContentHeader。布局设置如下。

我们发现右侧样式 1并没有出现,那是因为 @IBInspectable可以设置的类型受限。
参考资料: 使用IBDesignable和IBInspectable构建自定义UI控件。
⚠️
Xib是走的init(frame:NSFrame)方法的

@IBInspectable并不支持我们 enum的类型,我们只能设置 Int类型进行设置了。
修改 style为 Int类型。
@IBInspectable var style:Int = 0 {
    didSet {
        guard let headerStyle = ContentHeaderStyle(rawValue: self.style) else {
            return
        }
        switch headerStyle {
        case .value1:
            self.loadStyle1()
        case .value2:
            break
        }
    }
}
⚠️我们需要设置
ContentHeaderStyle继承与Int类型不然没有初始化方法。

此时我们的 Xib已经可以看出来效果了。
我们运行发现,程序已经崩溃了。

看来是因为什么值为 nil导致的。

我们发现是因为我们写的方法 loadStyle1()初始化 ContentHeaderValue1传入 nil值导致的。
⚠️ 不清楚为什么经常
Xib显示失败,暂时没找到解决的原因。暂时可能是
Cocoapods库导致,导入Cocoapods库。

因为我们 文章 页面 数据的页面比较相似我们就 写一个类做一个模板。
制作 文章 页面 数据的模板
新建一个类 BaseListView继承于 NSView。
class BaseListView: NSView {
override init(frame frameRect: NSRect) {
    super.init(frame: frameRect)
    self.loadXibView()
}

required init?(coder: NSCoder) {
    super.init(coder: coder)
    self.loadXibView()
}
prepareForInterfaceBuilder()只能设置属性在所属的类里面。
我们设置 SideMenuView类里面。
override func prepareForInterfaceBuilder() {
    self.menuItems = [
        SideMenuItemConfiguration(title: "文章", iconHex: "F02D", hidden: true, selected: false),
        SideMenuItemConfiguration(title: "页面", iconHex: "F15C", hidden: false, selected: false),
        SideMenuItemConfiguration(title: "数据", iconHex: "F1C0", hidden: true, selected: false),
        SideMenuItemConfiguration(title: "文件", iconHex: "F15B", hidden: false, selected: false),
        SideMenuItemConfiguration(title: "配置", iconHex: "F013", hidden: true, selected: false),
        ]
}

这样我们就可以在 Xib实时的看到效果了。
我们之前封装的 SideMenuItemView似乎不太适合我们这里的按钮,如果只是显示文字我们还需要还需要隐藏前面的 NSImageView,我们按钮直接用系统的 NSButton。
我们替换成 NSButton之后似乎又遇到了另外的棘手的问题,那就是 NSButton竟然没有地方可以设置 title的颜色。
如何设置 NSButton标题的颜色
NSButton how to color the text。
纵观网上的教程大都是设置按钮的富文本或者是 NSMutableParagraphStyle。但是 NSMutableParagraphStyle这个不太靠谱,我觉得我们设置富文本比较好一些。
设置 NSButton的分类用于设置分文本字体的颜色。
extension NSButton {
    @IBInspectable var titleColor:NSColor? {
        get {
            return self.attributedTitle.attribute(NSForegroundColorAttributeName, at: 0, longestEffectiveRange: nil, in: NSMakeRange(0, self.title.characters.count)) as? NSColor
        }
        set {
            guard let color = newValue else {
                return
            }
            let mutableAttributeString = NSMutableAttributedString(string: self.title)
            mutableAttributeString.addAttribute(NSForegroundColorAttributeName, value: color, range: NSMakeRange(0, self.title.characters.count))
            self.attributedTitle = mutableAttributeString
        }
    }
}
使用 Module名称解决名字冲突问题
在set方法里面我们为了我们get方法获取是正确的,我们使用 print函数输出。发现竟然弹出打印界面。

我查看一下原来是 NSView重写了 print导致我们调用直接走 NSView的方法。
感谢 @2017Swift群里面的 Sin大神帮忙解决了这个问题。遇到命名冲突的可以在前面添加 Module名字。
Swift.Print(self.titleColor)
这样就可以正常的打印了。
NSButton设置 attributedTitle之前的对齐方式失效
还有一个问题出现了,那就是 Xib设置文字居中,竟然运行在左边。

经过查证是下面代码导致的。
self.attributedTitle = mutableAttributeString

这个是在 NSButton setAlignment不起作用搜到的解释。意思是我们用 NSAttributedString之前设置对齐方式已经失效了。

我们在 NSMutableAttributedString也看到了说明。我们需要采用 NSMutableParagraphStyle进行设置字体对齐方式了。
关于 NSMutableParagraphStyle
let style = NSMutableParagraphStyle()
style.alignment = self.alignment
let dict = [
    NSForegroundColorAttributeName:color,
    NSParagraphStyleAttributeName:style
]
let mutableAttributeString = NSMutableAttributedString(string: self.title, attributes: dict)
这样我们就可以看到对其按照我们 Xib设置的了。
⚠️ 我们设置字体的颜色也需要在
dict进行富文本设置。
NSFontAttributeName设置字体大小。

我们 Header的框架大体已经做出来了。但是还需要进一步的封装一下。
文章这两个字可以自定义。新建文章的标题可以自定义搜索标题可以自定义- 按钮的事件可以自定义
- 搜索事件可以自定义
我们在 ContentHeaderValue1关联一下 Label可以让外接设置 Label的文字。
@IBOutlet weak var titleLabel: NSTextField!
为了可以获取到我们 Header的元素,我们需要新增一个方法用于获取 ContentHeader上面自定义控件。
var headerContent:NSView? {
    get {
        let views = self.rightContentView.subviews
        guard views.count > 0 else {
            return nil
        }
        return views.first
    }
}
我们给 BaseListView新增一个属性用于设置 Label的文字。
var title:String? {
    get {
        return self.header.titleLabel.stringValue
    }
    set {
        guard let title = newValue else {
            return
        }
        self.header.titleLabel.stringValue = title
    }
}
我们新建一个类 PostsView用户展示 文章列表界面。
我们在 PostsView新增一个 BaseListView布局如下。

为了让 ViewController在右侧可以显示正确的界面,我们在 ViewController的右侧新增一个 NSView作为父试图,布局如下。
@IBOutlet weak var rightContentView: NSView!

我们新建一个数组存放我们右侧页面。
var views:[NSView] = []
我们新增一个方法把需要展示的试图添加进去。
func addViews(viewType:NSView.Type) {
    let posts = viewType.init(frame: self.rightContentView.bounds)
    posts.autoresizingMask = [.viewWidthSizable,.viewHeightSizable]
    self.views.append(posts)
}
我们需要获取左侧功能按钮的点击回调来展示对应的界面。
我们在 SideMenuView.swift新增一个闭包回调用于告诉外部当前点击的索引。
typealias SideMenuViewSelectMenuIndexCompletionHandle = (_ index:Int) -> Void
我们新增一个 SideMenuViewSelectMenuIndexCompletionHandle的属性用来回调我们点击的索引。
var selectMenuCompletionHandle:SideMenuViewSelectMenuIndexCompletionHandle?
我们在 didClickRow方法把当前的索引回调回去。
if let completionHandle = self.selectMenuCompletionHandle {
    completionHandle(row)
}
我们关联一下 ViewController界面上面的 SideMenuView。
@IBOutlet weak var sideMenu: SideMenuView! {
    didSet {
        self.sideMenu.selectMenuCompletionHandle = { [weak self] index in
            self?.changeContentView(index: index)
        }
    }
}
func changeContentView(index:Int) {
    for view in self.rightContentView.subviews {
        view.removeFromSuperview()
    }
    guard self.views.count > index else {
        return
    }
    let addView = self.views[index]
    self.rightContentView.addSubview(addView)
}
我们在 viewDidLoad方法里面注册我们的类。
self.addViews(viewType: PostsView.self)

我们发现我们并没有出现我们的文章页面。
因为我们初始化的时候,我们回调的属性还没有初始化,索引我们要在属性 set方法进行一次回调。
var selectMenuCompletionHandle:SideMenuViewSelectMenuIndexCompletionHandle? {
    didSet {
        guard let selectMenuCompletionHandle = self.selectMenuCompletionHandle else {
            return
        }
        selectMenuCompletionHandle(currentMenuIndex)
    }
}
private var currentMenuIndex:Int = 0
func changeTabeleViewState(row:Int, tableView:NSTableView) {
  currentMenuIndex = row
  ....
 }
但是奇怪的是我们的界面还是没有出现,是因为当默认回调之后我们的试图数组还没有初始化。
我们可以在回调的时候保留一下我们的索引,在 ViewDidLoad可以刷新对应的索引。
var sideMenuIndex:Int = -1
self?.sideMenuIndex = index
self.changeContentView(index: self.sideMenuIndex)

貌似只是文章显示出来了,我们的按钮和搜索框并没有出现。
原来是我们并没有设置右侧 Header的样式,我们在 PostsView声明一下变量。
@IBOutlet weak var listView: BaseListView! {
    didSet {
        self.listView.header.style = 0
    }
}

此时我们右侧的界面已经出现了。

我们的界面最小宽度有些不够,我们设置最小为 900x600。
第二部教程到此结束。